The
Vehicle
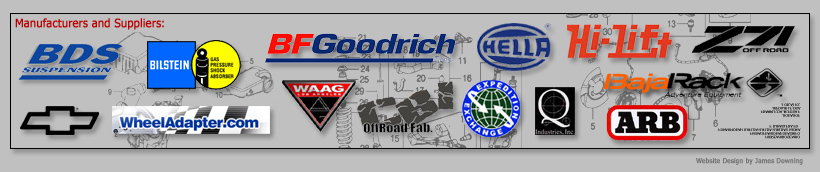
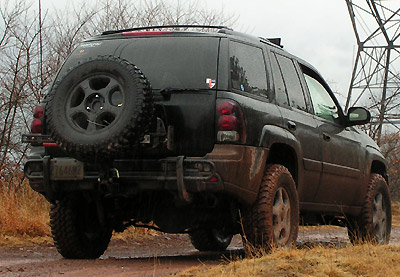
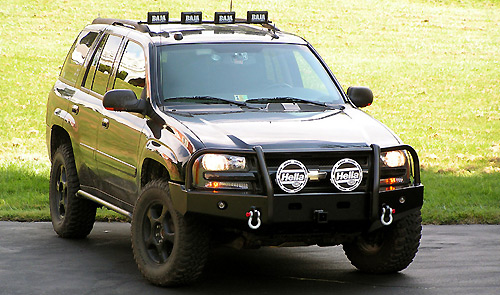
Above is how I first saw my
new vehicle on AutoTrader.com. The vehicle is a 2005 Chevrolet
TrailBlazer with LT trim. It is essentially loaded, only missing
the factory navigation unit. While those various bells and
whistles have little merit on the trails, they are very nice for long
trips and everyday commutes. There were a few options I
specifically looked for when purchasing the truck.
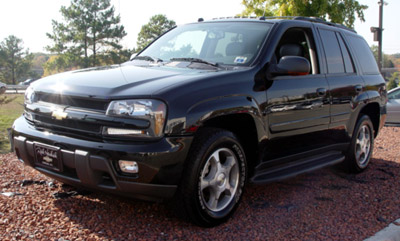
The first thing to look for
was the 4wd
option. The TrailBlazer is actually very well equipped in this
area. There are four selection choices, described below:
2 HI - Standard
rear wheel drive.
A4WD - When the computer senses wheel slippage, the front
wheels instantly engage.
4 HI - Locks the front and rear drive shafts. 1:1 drive ratio.
4 LO - Shifts the 4WD into a 2.7:1 crawl ratio.
Click
here for a detailed description of the internal operation of the NVG
226 transfer case.
The second major option needed
for trail driving is the Eaton G80 factory rear locker. Look for
the G80 code in the glove box to verify that your vehicle has one.
It is an automatic mechanical locker. Once it senses slippage
between the rear wheels (in any drive mode) it locks the rear half
shafts together until the input torque is taken from the drive shaft.
The TrailBlazer has a
optional V8, however I opted for the I6 due to the slightly increased
fuel mileage and room under the hood. The TrailBlazer also has a
long wheel base option (EXT). If you want to have better luck off
road, I recommend the short wheel base (SWB). There are some
members at TrailVoy.com that wheel the EXTs with some success, however
the break- over angle is much better for the SWBs. The improved
angle will help you from getting high-centered.
I also looked for leather
seats. Just between you and me, its a whole lot easier to wipe mud
and dirt off leather than cloth. Plus, the leather option has
heated seats, which keeps the Mrs. happy. The
integrated satellite radio and Bose sound system could also be nice for long hauls.
I could go into all the reasons this vehicle is perfect for me, but I
will hold off.
TOP
Brush
Guards - by WAAG
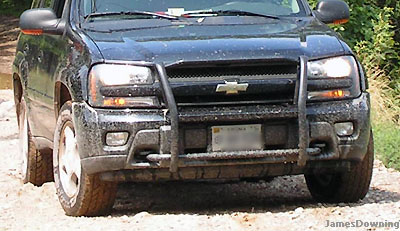
I began my modifications
with some minor things. First to come were brush guards.
These are not essential off road items, but the added front and rear protection
off road and in the Baltimore traffic appealed to me. I chose the
best name in brush guards, WAAG. Yes, they are much more
expensive, but they are the only guards for the TrailBlazer that do not
mount under the front bumper. Instead, they share the tow
hook mounting holes. This preserves the approach angle of the
vehicle, yet still protects the lowest part of the plastic bumper from a
run-in with the ground in a high angle situation. The
WAAG is also the only brush guard for the TB that has a four- point mounting system,
thus making it ultra-sturdy when compared to the other guards. I have
no problems pushing other vehicles, and there are no added vibrations in
the guard, making it a great mount for auxiliary lights. I will
probably be purchasing the headlamp protectors down the road.

The rear guard is less
sturdy than the front, but is still quite useful. The first being
traffic protection. It also provides extra foot-area when reaching
items on the roof. The guard mounts to the bumper attachment
bolts, on either frame rail. Even though these do sit below the
bumper, it does not destroy the approach angle much. If anything,
it will provide some extra ground protection, which is always nice.
I would not advise using either brush guard as a recovery
or lifting point, even though they are both frame mounted.
TOP
Auxiliary
Lighting

For grille lighting, I
chose the Hella Rallye 4000s. Hella offers a few beam options for
these 9" monsters. I opted for the cornering beam pattern. This does not
only throw light to the side, like the name may imply. Instead, it
throws an abnormally wide beam pattern (a cross between a fog and euro
beam) that is perfect for tight
maneuvering in low visibility situations. A wide beam is much more
useful than a far-reaching focused beam when driving off road. At 100 Watts per light,
the output is formidable.
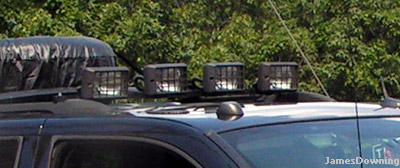
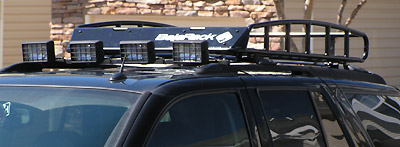
 In addition to the brush
guard lights, I built a roof mounted light rack. This comes in
handy when driving in late-day situations or even night driving. I
have also noticed they are quite helpful when driving in snow. The
increased lighting angle allows less light to reflect off the surface of
the snow, therefore improving road visibility. However, it is not
to be used in fog because the beam crosses right in front of the
windshield. In that situation, the light reflects right back into
the driver's eyes. Click the
link above to TrailVoy.com for a detailed write up that includes a materials list and
detailed build instructions with pictures (just keep reading the
thread).
In addition to the brush
guard lights, I built a roof mounted light rack. This comes in
handy when driving in late-day situations or even night driving. I
have also noticed they are quite helpful when driving in snow. The
increased lighting angle allows less light to reflect off the surface of
the snow, therefore improving road visibility. However, it is not
to be used in fog because the beam crosses right in front of the
windshield. In that situation, the light reflects right back into
the driver's eyes. Click the
link above to TrailVoy.com for a detailed write up that includes a materials list and
detailed build instructions with pictures (just keep reading the
thread).
TOP
Suspension
Lift
After
making sure I had the
proper recovery equipment, it was time to begin the big modifications.
A proper suspension lift takes a lot of planning on these
vehicles. By proper, I mean upgrading the necessary secondary
parts along with the lift. I also did not want to go through a
portion of time with a lift and undersized stock tires, so bigger tires were to
accompany the lift 'package.' For me, the package included the
lift, rear springs, front shocks, and wheel spacers.
The TrailBlazer is unfriendly to being lifted due to the front differential's unusual
mount to the engine's oil pan. The half-shaft actually runs
through the pan. I believe this was done by the Chevy engineers in an attempt to make
the engine as low as possible. While this does make a lift greater
than about 3" impossible without extreme changes, the resulting low hood does provide the
driver with a good view of the trail and the low CG gives us decent
lateral stability.
The TrailBlazer aftermarket
is very small when it comes to lifts (lowering kids are a different
story). We have four options that I know of: BDS,
Suspension
Maxx, Rough
Country and MarkMC.
A Suspension Maxx kit includes either front or rear spacers. Their
front kit is made of polycarbonate, and the rear is cast aluminum and
they offer lifts from 1" to 2.5". The rear spacer mounts
to the axle side of the rear springs.
 MarkMC
is a member and vendor on Trailvoy.com that sells quality kits that are
similar to Suspension Maxx, except his is metal, as opposed to
polycarbonate. Mark sells kits up to 2.5" high up front and
is working to expand his market to new products.
MarkMC
is a member and vendor on Trailvoy.com that sells quality kits that are
similar to Suspension Maxx, except his is metal, as opposed to
polycarbonate. Mark sells kits up to 2.5" high up front and
is working to expand his market to new products.
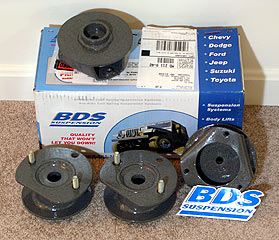
The BDS kit, which I have
and personally prefer, (to the right) advertises 2" of lift, front and rear
spacers included. While the BDS kit is the most expensive of the
options, I feel it offers the greatest strength and
durability, and that matters off the road. It replaces the front
upper strut mounting plate and is made completely of steel. The
rear BDS spacer mounts to the top of the spring and is retained by a
couple bolts. The kit includes new upper strut mounting bushings and
new hardware.
I don't know much about the
Rough Country lift, I'll update this when I know more. It appears
to be similar to the BDS, but has a smaller rear spacer. It's sold
as a 'leveling kit'... something us off roaders don't care much about.
There have been some questions regarding how
strut spacers work, so I made the below diagram to help explain how they
add lift, yet retain the stock (and safe) maximum suspension extension.
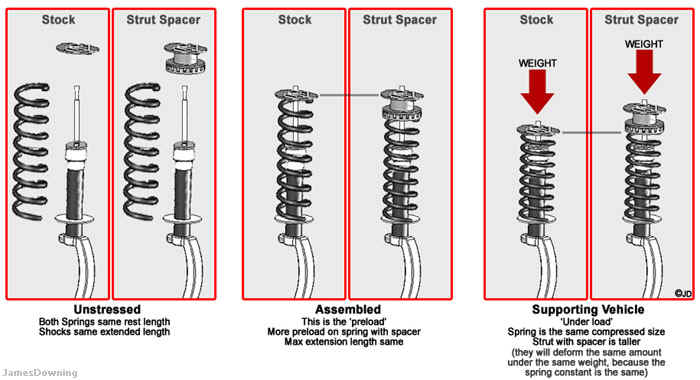
(roll over with mouse to expand
diagram)
BDS also offers a 2"
body lift. A body lift is different from a suspension lift, and is
only possible on a frame-based truck. It essentially replaces the
bushings that are located between the frame and the body with taller
ones.
For part numbers and in-depth
lift information follow the link to the right.
TOP
Rear Z71
Springs/Shocks
 The last part of the lift equation
is the rear springs and shocks. Stiffer rear springs are desirable
here because of the heavy loads I tend to carry with me. The
stiffer springs also produce additional lift and can be coupled with
lift spacers.
The last part of the lift equation
is the rear springs and shocks. Stiffer rear springs are desirable
here because of the heavy loads I tend to carry with me. The
stiffer springs also produce additional lift and can be coupled with
lift spacers.
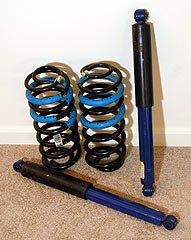
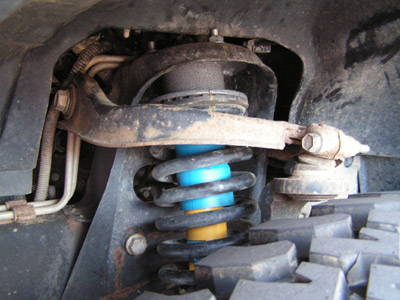
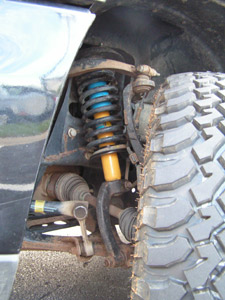
Here again, the TrailBlazer
aftermarket is poor. Amazingly, a member of TrailVoy Off Road
found that Z71 Tahoe springs and shocks (pictured to the right) were direct
bolt-ons for our
vehicle. While they have the same resting length as our stock
springs, they have a non-linear spring rate, and sit about 1.5"
higher than stock when on our vehicles. This means they will
compress less when loaded down or towing. The Z71 shocks are also
beneficial in that they are slightly longer than our stock shocks (to
allow slightly greater articulation) and they have a more aggressive dampening
effect. To find these jems, search eBay (and include the
description in your search) for the GM part number, 15234633.
TOP
Front
Shocks
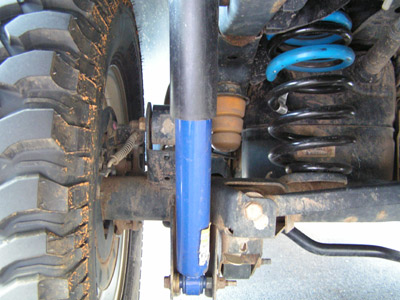
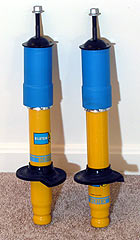 Since the
front strut is already all
apart when doing a spacer lift, it's a great time to replace
the front shocks. I chose Bilstein HDs (pictured to the right)
from ShockWarehouse.com.
I have read great reviews of these shocks, which are developed to
provide better stability and bump rebound control. With the improved
performance combined with the club discount from TrailVoy.com, they are a
no-brainer addition.
Since the
front strut is already all
apart when doing a spacer lift, it's a great time to replace
the front shocks. I chose Bilstein HDs (pictured to the right)
from ShockWarehouse.com.
I have read great reviews of these shocks, which are developed to
provide better stability and bump rebound control. With the improved
performance combined with the club discount from TrailVoy.com, they are a
no-brainer addition.
TOP
Wheel
Spacers / Wheel Backspacing
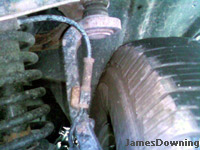
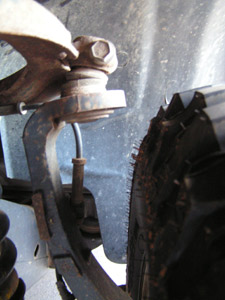
 The
TrailBlazer is further unfriendly to people wishing to do a lift or
increase the tire size. The first obstacle is the positioning of
the upper ball joint that is located
on the steering knuckle, above the tire (see the picture below).
This severely inhibits a larger tire size unless you install wheel hub
spacers (pictured to the right) or purchase wheels with a
backspacing of less than 4. I purchased wheel spacers from WheelAdapter.com
after the recommendation from fellow TrailVoy members.
The
TrailBlazer is further unfriendly to people wishing to do a lift or
increase the tire size. The first obstacle is the positioning of
the upper ball joint that is located
on the steering knuckle, above the tire (see the picture below).
This severely inhibits a larger tire size unless you install wheel hub
spacers (pictured to the right) or purchase wheels with a
backspacing of less than 4. I purchased wheel spacers from WheelAdapter.com
after the recommendation from fellow TrailVoy members.
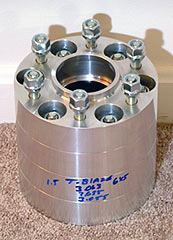
If you wish, a wheel spacer
can also act as an adapter to change the lug pattern to match a new
wheel. I requested four 1.5" hub and wheel-centric billet
aluminum spacers. Fred (the owner of Wheel Adapter) knew all of the necessary dimensions and
shipped them out the next day.
If you are planning to use
the stock bolt pattern, remember, it is NOT 6x5.5", as most
Chevy trucks are. Our stock lug pattern is 6x5", or 6x127mm.
TOP
Tires
This
is one place where we do have a few options, since they are basically
universal. Now remember, without wheel hub spacers, no matter the lift, you are limited to about
30.5" tires due to the upper ball joint (still better than the
stock 29.8 inchers). However, because I am using the hub spacers,
I can go quite larger (up to around 34" with a fair
amount of hammering, cutting, and more lifting). I decided to aim
a little more reasonably at 32 inch tires. After a lot of hunting around, I narrowed my
decision down to three of the best, yet still reasonably priced, mud-terrain tires.
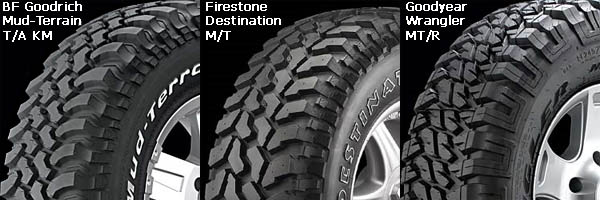
Each one had its own
distinctive advantages. Based upon my research at the time of this
report, I put the following table together. Keep in mind most
tire data for M/Ts is based upon other people's opinions.
| |
BFGoodrich
Mud-Terrain T/A KM |
Firestone
Destination M/T |
Goodyear
Wrangler MT/R |
| Advantages |
Rim
Protector
Reportedly the toughest
Adapted for Jeep Rubi
Endorsed
by Bill Burke |
Best
wet performance
Aggressive side lugs
Reportedly the quietest |
Offers
the widest option
Best snow traction |
Size
(close to 32" w/ 17"
rim) |
255
/ 75 R 17
(32.1 in) |
265
/ 70 R 17
(31.6 in) |
275
/ 70 R 17
(32.2 in) |
| Cost per |
$122.00 |
$181.00 |
$231.00 |
 The final decision came
down to a complex brain-bender based on each tire's price, diameter, and
advantages. A few things
weighed heavy on my mind. First, since I will be purchasing 5
tires, cost was a big deal, you just can't get around that. The second was the endorsement by Bill
Burke, who is essentially an off-road god. Burke has been teaching off-roading skills for over 20 years
and has been using BFGs the whole time with only 2 flats. The
third thing that carried the decision was that Jeep chose these same tires for
their off road beast, the Jeep Wrangler Rubicon (knowing this would mean
on and off road refinement). With those facts weighing on
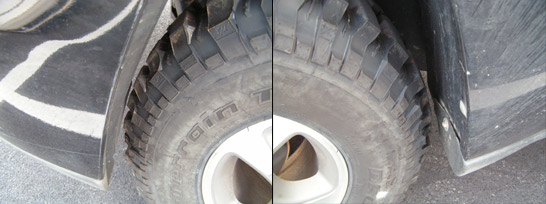
my mind, I chose the BFGs knowing I would be in good hands. I was
actually able to purchase the same adapted
tread design used on the Jeep Rubicon. Below is a comparison
of the tread patterns. In addition to the slightly different lug
design, the DTs have slightly less tread thickness in an attempt to
improve the stock mileage of the Rubicon. The reduced tire life
was offset in my mind by the great price and improved grip.
The final decision came
down to a complex brain-bender based on each tire's price, diameter, and
advantages. A few things
weighed heavy on my mind. First, since I will be purchasing 5
tires, cost was a big deal, you just can't get around that. The second was the endorsement by Bill
Burke, who is essentially an off-road god. Burke has been teaching off-roading skills for over 20 years
and has been using BFGs the whole time with only 2 flats. The
third thing that carried the decision was that Jeep chose these same tires for
their off road beast, the Jeep Wrangler Rubicon (knowing this would mean
on and off road refinement). With those facts weighing on
my mind, I chose the BFGs knowing I would be in good hands. I was
actually able to purchase the same adapted
tread design used on the Jeep Rubicon. Below is a comparison
of the tread patterns. In addition to the slightly different lug
design, the DTs have slightly less tread thickness in an attempt to
improve the stock mileage of the Rubicon. The reduced tire life
was offset in my mind by the great price and improved grip.
With
an increased tire size, there comes the possibility of needing to trim
back some of the fender in order to minimize tire rub. Follow the
link on the left for a detailed write-up by one of the TrailVoy members.
Luckily I did not have to trim, but I came very close.
 After installing the tires,
I have been quite pleased with the performance of these tires.
They stay fairly true on the highway, they seem to wander less than my
previous tires. They are very quiet; less noisy than driving over
a bridge with normal tires. The grip seems excellent also, as the
extra faces on the central lugs seem to really grip well.
After installing the tires,
I have been quite pleased with the performance of these tires.
They stay fairly true on the highway, they seem to wander less than my
previous tires. They are very quiet; less noisy than driving over
a bridge with normal tires. The grip seems excellent also, as the
extra faces on the central lugs seem to really grip well.
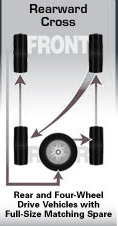
As an added tip, when
purchasing 5 tires (one as a dedicated spare) it is important to
incorporate the spare wheel into the tire rotation. This will
result in equally distributed use and maintain similar tread depths
through the life of the tires. I've seen numerous spare tires that
never get rotated into the mix. The result, when it's finally
called into action, is overworking of the differential at highway speeds
due to the extreme difference in tread depths. This is especially
possible with the deep tread of mud-terrains. For your reference,
the proper 5 wheel rotation pattern is displayed at the right (courtesy
of tirerack.com).
TOP
Suspension
Package and Tire Installation
When
you have your lift completed, it is critical to obtain a proper front
end alignment. When changing the geometry of an IFS, the camber and toe of
the wheel can be affected. This can lead to poor wear on your
tires due to them slightly scrubbing along the road during normal
travel. I had the entire install done by my trusted mechanic at
the Towsontowne Garage. Total charge for the install was about
$500 (including tire mount & balance, suspension install, and
alignment).
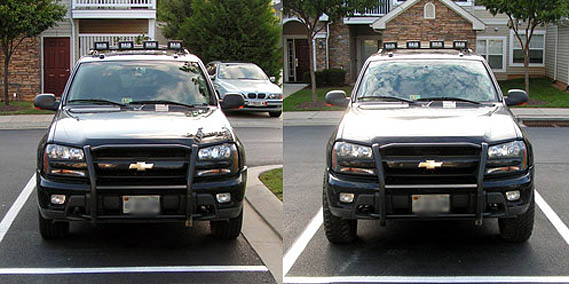
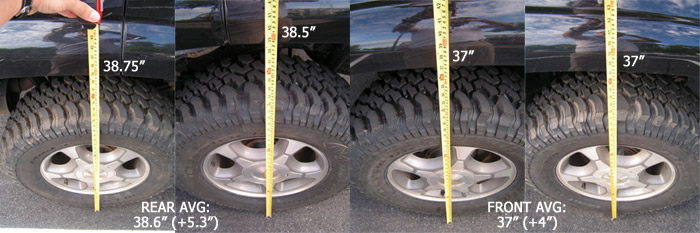
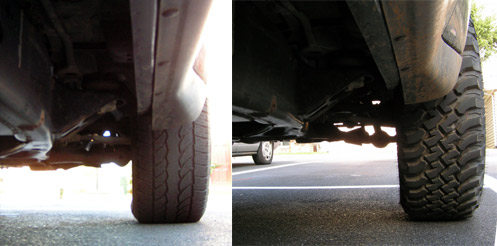
I have included some
various comparison photos and photos after the install:
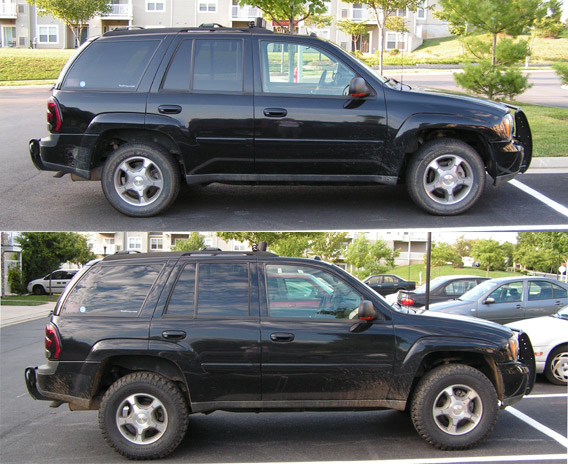

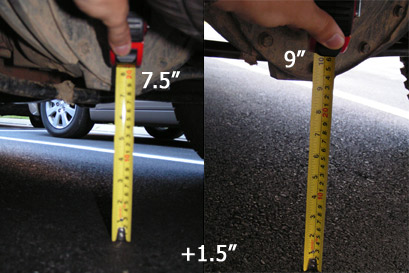
Keep in mind, the
measurements are somewhat inaccurate and will not all agree,
but they are a pretty good approximation.
BEFORE
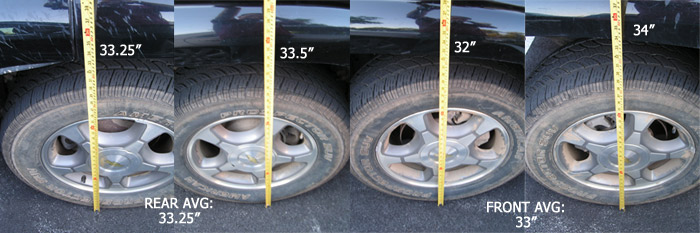
AFTER
Front clearance:
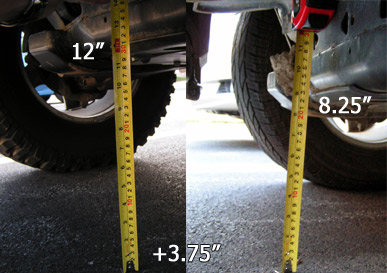
Rear differential
clearance:
Front suspension
droop:
Tire clearance to
fenders:
1/8" in front, 1/2" in rear
Suspension Details:
I experimented some with
the affects the modifications had on my gas mileage. I drove a 300
mile trip before and after the install and the following are my
results. Keep in mind, the car's computer estimated the gas
mileage based upon the 29.5" tires, and must be adjusted to give
comparable results (they must be multiplied by 1.085).
| |
Before Install |
After Install - by
computer |
After Install -
adjusted |
| Going to |
21.8 mpg |
16.5 mpg |
17.9 mpg |
| Coming from |
22.3 mpg |
18.5 mpg |
20.07 mpg |
| Average |
22.05 mpg |
|
19 mpg |
TOP
Rear
Cargo Organization
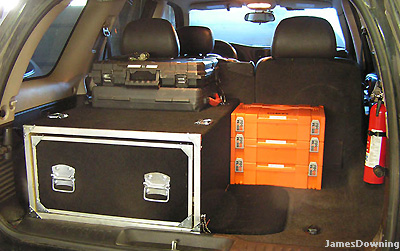
After driving around with
tons of recovery, repair, camping, and survival cargo rolling around in
the back, I took a note from other expedition vehicles I had seen.
The only word to properly describe these vehicles was organized.
I realized I needed to start taking steps in the proper direction.
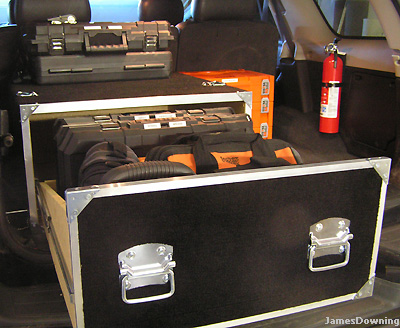
I loosely followed the
designs I had seen, including a fellow TrailVoy member's own
design. Wanting to retain use of the storage tub in the bottom of
the rear deck, I made the drawer half-size. This allowed the
drawer to be big enough to fit my gear cases, yet allow me to fit taller
pieces of cargo when necessary by removing the drawer entirely. To
remove the drawer itself only takes minutes.
I used retaining pins that
can hold the drawer in during transport, or out when accessing the
contents. The top is equipped with tie-down locations for securing
cargo, and there is a cavity between the rear seat and the drawer where
future electrical components will be mounted.
TOP
Underbody
Protection - by Skidplate Mafia
When
you rely on your vehicle to get you out of the forest, protecting the
moving parts of the vehicle is of utmost importance. The
TrailBlazer is severely lacking in this manner of protection. The
stock vehicle can come with a few options for skid plates which are
discussed at length on Trailvoy.com.
With these plates being
plastic, they provide little protection in real off road
situations. The radiator skid, which is metal, does not protect
the radiator from moving backwards once hitting a rock. This can
bind up the fan and has proven detrimental in some circumstances.
There are four main
possible areas for protection: the radiator, the oil pan, the gas
tank/transfer case area, and the differential.
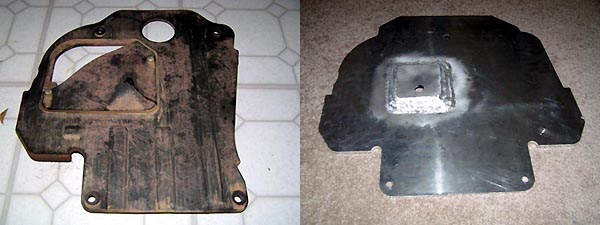
Oil Pan
Thanks to Mike Barton (bartonmd), the stock plastic
oilpan skidplate has been replaced. Mike manufactured a
replacement, bolt-on aluminum plate. Shown below (note the carnage
to my old skidplate):
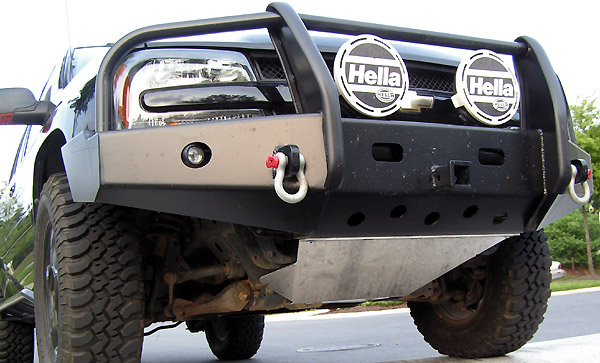
Radiator
After installing the custom bumper (details below)
I realized the radiator became very susceptible to damage by road or
trail debris. The lowest lip of the bumper left about 2" of
the radiator end cap open to the road. Being that the end cap is
plastic, a rock in the right place would easily leave me stranded on the
trail. So after speaking with Mike Barton again, I designed an
aluminum skid plate to span the distance between the IFS lower frame and
the front bumper.
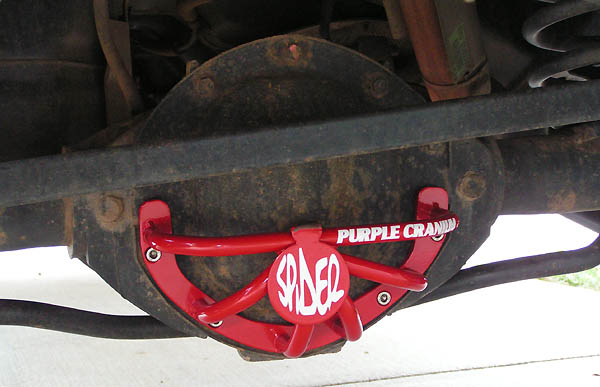
Differential
The differential is something that is rarely considered something
that needs more protection. While the axle housing is quite stout,
the differential cover is somewhat susceptible to damage. The
cover could be dented or bent at an edge by a rock (or other foreign
object), which may allow fluid to leak out. A good cover
reinforces the lower mounting flange of the diff cover (where it may get
bent by a rock sliding by), and also protects the center of the cover
(where it's more likely to get dented). The cover I purchased was
made by Purple Cranium,
called the Spider.
TOP
Custom
Switch Panel
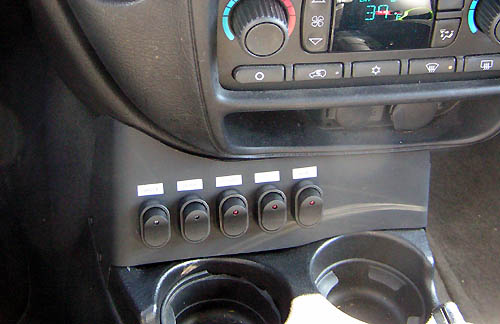
After
having mounted multiple lights on the vehicle, I needed a solid way to
mount the associated switches. I found one area that was unused,
out of the way, and discreet. The problem is that it did not have
a mountable surface. So to fix that I modeled my own switch
panel. Follow the link to Trailvoy for more pictures of the
construction.
TOP
Stream
Crossing Preparation
The
trailblazer is a decent vehicle for stream crossings. Most vents
are located at a decent level when stock. The lowest vent that I
am aware of is the rear differential vent, which is located at about
20" when stock. It is located above your spare tire.
With a few minor changes (as discussed in the link to the right) I was
able to increase the height to 33". The mechanical fan in the
front of the vehicle can also be stopped with a quick de-snap of an electrical
connector. This will keep the fan from throwing water all over the
engine bay.
I feel safe in anything up
to the middle of the bumper, however I am still wary about water ingestion
in the engine. For this, a member of the forum is working on
modifying an Xterra snorkel for our use. Check the off-road
section of TrailVoy.com for updates.
TOP
Rear
Spare Tire Carrier - by CBI Offroad Fab
The
trailblazer's under trunk spare tire system cannot fit tires that are
bigger than the stock size. So, that leaves us with two
options. The roof, or a custom rear carrier. I found a great
product made by CBI Offroad Fab to take care of that issue. Click
the link above for detailed pictures and discussion.
I had a few particular
things I was looking for. First was a pass-through receiver, so that I
can use a receiver shackle mount for the rear. Second was a hi-lift
mount. In addition, I didn't want wobble, I wanted to be able to see out my rear view
mirror, and I wanted to be able to open the glass without having to
swing down the carrier. Lots of stipulations, I know. Steve was
able to produce a great product.
TOP
Roof
Cargo Rack - by BajaRack
I
decided to get a roof rack for the TrailBlazer due to a few key
factors. First of all, I wanted to carry spare fuel. I also
wanted to be able to strap my mountain bike to the roof (now that my
rear was being used by the spare tire). Lastly, so I could use the
rear seats to transport people if necessary. (I've always wanted
to be able to bring a group of 4 camping. Before the rack, I had
to carry cargo in the rear seats.)
I was looking for something
that was solid, lightweight, and aerodynamic. BajaRack fit the
bill with the Mule. It is a welded carbon steel construction with a
powdercoat finish and aluminum wind faring. I designed aluminum
support bars for the rack that bolt into my roof rails. This makes
for an incredibly strong platform. However, due to the simplistic
mounts and the light weight of the rack, I am able to remove it or
install it in under three minutes. This makes for a strong and versatile
setup.
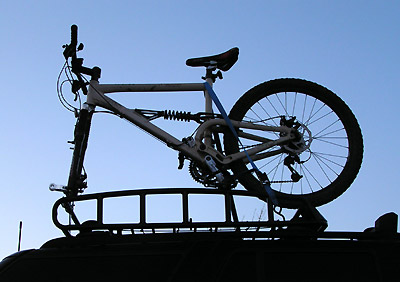
To fit my bike, I worked up
my own mount using a DeltaCycle Bike Hitch and some U bolts. So
far it's worked perfectly.
TOP
Rock
Sliders - by FTF (Freaky Tree Fab)
I
sprung for rock sliders due to the increasingly difficult trails that I
find myself on. Rock sliders act both as protection and as a tool
for traversing obstacles that are taller than your underbody clearance.
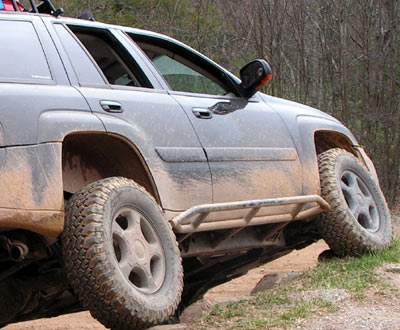
I contacted Freaky Tree Fab
(http://www.freakytreeoffroad.com/)
about making some sliders. He jumped at the opportunity and came
up with a great design. Take the link back to TrailVoy for in
depth photos. The sliders are made from 1 - 3/4" DOM
tube. Instead of bolts, we decided to weld directly to the
frame. Gussets were added to increase the rigidity.
I contemplated different
coatings, including line-x, powdercoating, and rattle canning. I
had seen some other people have good luck with powdercoats lasting a few
good rock bashes, and decided to follow suit. I'm glad I did, as
the powdercoat has been extremely tough.
Eric at FTF is currently
selling these for anyone interested. Contact him or follow the
link to TrailVoy for cost details.
TOP
Custom
Steel Bumper - by FTF (Freaky Tree Fab) and KMA (Kennesaw Mountain
Accessories)
I
decided I needed a full metal bumper for a few reasons:
- To provide better
recovery points for heavy recoveries
- Obtain a better approach angle and frontal clearance
- Mount new fog lights that would provide better light in poor
visibility conditions
- Provide a method of mounting a removable winch
- Protect the front-end of the vehicle from collisions
The
bumper originated as a Kennesaw
Mountain bumper. I liked their overall design, but I didn't
like some of the details, such as the fender hangover, and their brush
guard design. So I had my fabricator with FTF fix it exactly to my
liking (notice the resemblance to both the WAAG brush guard and my
sketch on the future modifications
page?). Follow the jump to Trailvoy for more detailed pictures and
a glimpse into the making of the bumper.
TOP